Rapid app prototyping with AngularJS and CouchDB
Tim Williams • May 10, 2015
Modern application prototyping in the web world has come to a point where creating an application can be about as fast (or faster) than detailed specifications can be written! How is this possible? Fire the back-end developer, you don’t need ’em! Using AngularJS and CouchDB you can create a virtually ‘back-end free’ application. Let’s dive right into the code.
I want to prototype a simple beer rating app that allows users to search for, add and rate beers. Yeah, I know, it’s been done, but never so SIMPLY!
Prerequisites
To follow along with this tutorial you’ll need to make sure you have the following things installed:
- CouchDB
-
I will use Node’s powerful package manager NPM to get all of the components I need for my application.
Step 1: Setup
I’m using Node.js for serving my static HTML and JavaScript files so I’ll set that up first. First I create a file structure to house my application:
| Beerrating.com/ | app.node.js | index.html | js/ | app.angular.js | views/
That’s all I need to get started, later we’ll add files for angular views. Now let’s load some required libraries. I pop open the terminal and navigate to my new application root
$ cd /beerrating.com
I use NPM for my dependency management, but you could equally well use bower. I know I need a few components to get started so I’ll run a few NPM install commands:
$ npm install express
$ npm install angular
$ npm install angular-route
$ npm install angular-resource
$ npm install angular-bootstrap
Now that I have the groundwork laid, I can create the node ExpressJS listener to serve my angular files. I open up the app.node.js file in our root directory and add the following code:
var express = require('express')
var app = express()
app.use(express.static(__dirname))
app.listen(8445)
If you are using apache, you’ll just need to create a new server or a VirtualHost for an existing on and point the document root to the root of the beerrating.com application. Next I create an HTML file which will act as the wrapper of the application:
<!DOCTYPE html>
<html ng-app="app">
<head>
    <title>Beer Ratings 'n Stuff
    <link rel="stylesheet" href="https://maxcdn.bootstrapcdn.com/bootstrap/3.3.4/css/bootstrap.min.css">

    <script src="node_modules/angular/angular.min.js" type="text/javascript" charset="utf-8">

    <script src="node_modules/angular-bootstrap/dist/ui-bootstrap.min.js" type="text/javascript" charset="utf-8">
    <script src="node_modules/angular-bootstrap/dist/ui-bootstrap-tpls.min.js" type="text/javascript" charset="utf-8">
    <script src="node_modules/angular-route/angular-route.min.js" type="text/javascript" charset="utf-8">
    <script src="node_modules/angular-resource/angular-resource.min.js" type="text/javascript" charset="utf-8">
    <script src="js/app.angular.js" type="text/javascript" charset="utf-8">
</head>
<body>
    <header class="row-fluid">
        <nav class="navbar navbar-default navbar-inverse" role="navigation">
            <div class="container">
                <div class="navbar-header">
                    <a class="navbar-brand" href="#/">
                        BeerRatings.com
                    </a>
                </div>
            </div>
        </nav>
    </header>
    <div class="container">
        <div ng-view></div>
    </div>
</body>
</html>
In the head tag I am loading the bootstrap CSS as well as the angular dependencies I installed with NPM earlier. Now I can begin to craft the angular framework that will power this application. I open my app.angular.js file and add the following:
angular.module('app', ['ngResource','ngRoute','ui.bootstrap'])

    .config(['$routeProvider', function($routeProvider) {
        $routeProvider.
            when('/', {
                templateUrl: 'views/beers.html',
                controller: 'Home'
            }).
            when('/beer/:beerId', {
                templateUrl: 'views/beer.html',
                controller: 'Beer'
            }).
            otherwise({
                redirectTo: '/'
            });
        }]
    )

    .controller('Home', function($scope) {

    })

    .controller('Beer', function($scope) {

    })
In a larger application I would probably start off by separating my controllers and config functions into separate name-spaced files, but for brevity I will keep it all in my master application file here. First I bootstrap angular and load my resources, then I setup the basic router for the 2 views I know I will need. The home view will be a listing of all beers, and I will have a detail page where all reviews for a beer can be seen. With my basic routing setup I add 2 controllers where I will later plug in the UI bindings for each view.
Step 2: Models and Resources
With the display framework worked out I can start to define my resources and connect them to my database. Here is where CouchDB really shines, it’s going to talk the same language as my application JSON. This means I will not have to write server side code to handle interpreting the input and formatting it for a more traditional SQL database. For prototyping this is roughly going to cut my workflow in half! Ok, down to business. First I want to create a database to house all of my beers in the CouchDB server. I open up a terminal and run this CURL command:
curl -X PUT http://127.0.0.1:5984/beers
Cool, now I should have a database ready to receive data! (that was EASY!) Ok before we get too excited let’s make sure the database actually exists. I run another CURL command from the terminal to check:
curl -X GET http://127.0.0.1:5984/beers
If all went well I should get some JSON output from the server that looks like this:
{"db_name":"beers","doc_count":0,"doc_del_count":0,"update_seq":0,"purge_seq":0,
"compact_running":false,"disk_size":79,"data_size":0,"instance_start_time":"1430274132090847",
"disk_format_version":6,"committed_update_seq":0}
Now if we try to connect to our database with angular, it’s going to throw a cross domain error. To get around this issue I need to enable CORS from CouchDB. If you are running Couch on the default port you can get to the config file by going to http://127.0.0.1:5984/_utils/config.html. Under the httpd section I will set ‘enable_cors’ to ‘true’, then I will ‘Add a new section’ and supply the following data
section: cors option: origins value: *
In a production environment I would probably tie CORS down to whatever domains I expect to receive requests from, but we are building a prototype and not a production app. Now that my application is reachable I can begin to craft a resource for the beers a prototype for a beer and a review.
The Beer Object
    // add to my app.angular.js file
    .factory('Beer', function() {
        return {
            '_id':null,
            'setId' : function() {
                this._id = encodeURIComponent((this.brand + '_' + this.name).replace(' ', '_'));
            },
            'brand' : '',
            'name' : '',
            'abv' : '',
            'type' : '',
            'reviews' : []
        };
    })
The beer factory returns beer objects which are a prototype of how I want the beer document to be saved in my database. To prevent people from putting in multiples of the same beer I created the function ‘setId’ which I will fire upon creation of a new beer document in my database. Now if someone tries to add another of the same beer, the database will refuse to create it. Everything else is the basic structure of fields the user will fill out.
The Review Object
// add to my app.angular.js file
    .factory('Review', function() {
        var Review = {
            'rating':'',
            'review':'',
            'date': ''
        };

        var d = new Date();
        var reviewDate = d.getMonth()+ '/' +d.getDay()+ '/' +d.getFullYear();

        Review.date = reviewDate;

        return Review;
    })
The review factory returns a review object which will be added to the Beer.reviews array. Note I’m doing some constructor magic here by supplying a date to the the object upon creation. This saves me from needing to do the logic elsewhere.
The Beers Resource
    // add to my app.angular.js file
    .factory('Beers', function($resource) {

        var Methods = {
            'getAll': {
                'method':'GET',
                'url':'http://localhost:5984/beers/_all_docs',
                'params': {
                    'include_docs':true
                },
                'isArray':true,
                'transformResponse':function(data) {
                    var returnOb = angular.fromJson(data);
                    return returnOb.rows;
                }
            }
        };

        var Beers = $resource('http://localhost:5984/beers/:id',{'id':'@id'},Methods);

        return Beers;
    })
This factory returns a resource object which will have all of the standard API methods I need to CRUD my beer object. One of the things to take note of is the the method I am adding ‘getAll’ which uses CouchDB’s built in _all_docs method to retrieve a listing of all beers. I also am setting the param ‘include_docs’ to true. This will tell CouchDB that I also want the documents along with each record, otherwise it will return just an array of the document IDs (not really useful for a listing page!)
Step 3: Integrate the Views and Controllers
In building the factory resources I have built the backbone of all of the object I need to power my application. Now I can go about building out the UI. I like to build out my application prototypes in the order that a user would interact with the application.
The Listing Controller and View
    // add to my app.angular.js file
    .controller('Home', function($scope, Beers) {
        Beers.getAll(function(ob) {
            $scope.beers = ob;
        });
    })
<div class="beer-list">
    <h1>Beers
        <a href="#/beer/new" class="btn btn-default pull-right"><span class="glyphicon glyphicon-plus"></span> Add A Beer</a>
    </h1>
    <alert ng-if="beers.length == 0" type="info">There are currently no beer reviews, be the first to add one!</alert>
    <div class="list-group">
        <a href="#/beer/{{beer._id}}" ng-repeat="beer in beers" ng-init="beer = beer.doc" class="beer list-group-item">
            <h3>
                {{beer.brand}}
                <em>{{beer.name}}</em>
                <small class="pull-right">{{beer.abv}}% abv</small>
            </h3>
        </a>
    </div>
</div>
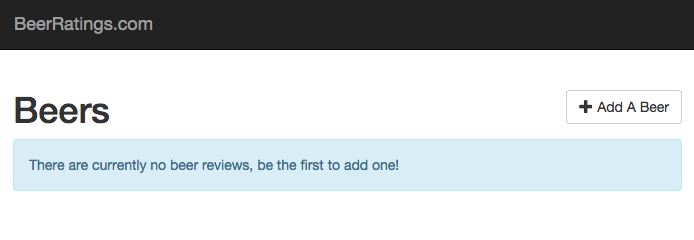
This controller is very simple. It’s job is to retrieve a list of beers from the .getAll function we decorated our $resource object with. Once loaded it sets the scope level variable ‘beers’ with the returned listing. The listing view is pretty simple it adds an [+ Add A Beer] button which has a special parameter in the URL ‘new’ which I will use to indicate a new document when we get to the detail view and controller.
The listing also uses an ng-repeat directive to loop through all of the beers we retrieved from the database, which at this point is none. Each beer listed is a link which uses the same URL structure for my ‘new’ beer except with the ID of the beer to look up when we get to the view. Above the listing I put a special alert that show when there are no beers. Great! The application is really taking shape!
The Detail Controller
// add to my app.angular.js document
    .controller('Beer', function($scope, $location, $routeParams, Beers, Beer, Review) {
        $scope.edit = false;
        $scope.review = false;

        if( $routeParams.beerId == 'new' )
        {
            $scope.beer = new Beers(Beer);
            $scope.edit = true;
        }
        else
        {
            getBeer()
        }

        $scope.save = function() {
            if( $routeParams.beerId == 'new' )
            {
                $scope.beer.setId();
                $scope.beer.$save().then(function() {
                    $location.path('/');
                });
            }
            else
            {
                $scope.beer.$save().then(function() {
                    getBeer();
                })

                $scope.edit = false;
            }
        }

        $scope.toggleEdit = function() {
            if( $routeParams.beerId == 'new' )
            {
                $location.path('/');
            }
            else
            {
                $scope.edit = $scope.edit ? false : true;
            }
        }

        $scope.addReview = function() {
            $scope.review = Review;
        }

        $scope.saveReview = function() {
            $scope.beer.reviews.unshift($scope.review);
            $scope.beer.$save().then(function() {
                getBeer();
            });
            getBeer();
            $scope.review = false;
        }

        function getBeer() {
            Beers.get({id:$routeParams.beerId}, function(beer) {
                $scope.beer = beer;
            });
        }
    })
The detail view handles CRUD for both the beer object and for reviews which decorate it. There is a lot going on in this controller so let’s break it down. In the first if clause I am checking if I am dealing with a new beer, or a beer that already exists.
        // Line 6 of the Beer controller
        if( $routeParams.beerId == 'new' )
        {
            $scope.beer = new Beers(Beer);
            $scope.edit = true;
        }
        else
        {
            getBeer()
        }
If it’s a new beer I want to start out in edit mode. I also want my scope level variable ‘beer’ to be the document prototype I setup for saving to the database, and I also want it to be a Beers resource. So I instantiate a new Beers resource and pass in the Beer from my factory. What I end up is a $resource object that has all of the properties I need to create a record.
Next is the save function which also has a special if clause to differentiate how new documents are handled vs already existing documents.
// Line 16 of the Beer controller
        $scope.save = function() {
            if( $routeParams.beerId == 'new' )
            {
                $scope.beer.setId();
                $scope.beer.$save().then(function() {
                    $location.path('/');
                });
            }
            else
            {
                $scope.beer.$save().then(function() {
                    getBeer();
                })

                $scope.edit = false;
            }
        }
If we are dealing with a new document we call the method ‘setId()’ on the beer object to make a unique ID out of the user input beer brand and name. This will not only prevent duplicate beers, but also provide a nicely readable resource URL.
// Line 34 of the Beer controller
        $scope.toggleEdit = function() {
            if( $routeParams.beerId == 'new' )
            {
                $location.path('/');
            }
            else
            {
                $scope.edit = $scope.edit ? false : true;
            }
        }
This public function handles both the [cancel] button I’ll add to the beer editor, as well as the [edit] button I will add to the read-only view. If we are creating a new beer and [cancel] is clicked I want the user routed back to the listing page, otherwise we’ll simply toggle the edit view.
// Line 45 of the Beer controller
        $scope.addReview = function() {
            $scope.review = Review;
        }

        $scope.saveReview = function() {
            $scope.beer.reviews.unshift($scope.review);
            $scope.beer.$save().then(function() {
                getBeer();
            });
            $scope.review = false;
        }
These functions both deal with the Review object. The addReview public function will be a button from my read-only view which will toggle a form to edit the Review object we passed into the controller. The saveReview function adds the new review to the beginning of the Beer.reviews array and saves the beer document, then it retrieves the newly reviewed beer from the database.
// Line 58 of the Beer controller
        function getBeer() {
            Beers.get({id:$routeParams.beerId}, function(beer) {
                $scope.beer = beer;
            });
        }
This private getBeer() function uses the $routeParams object which passed in the ID of the current beer from the URL to get the specific beer we are dealing with in this view.
The Detail View
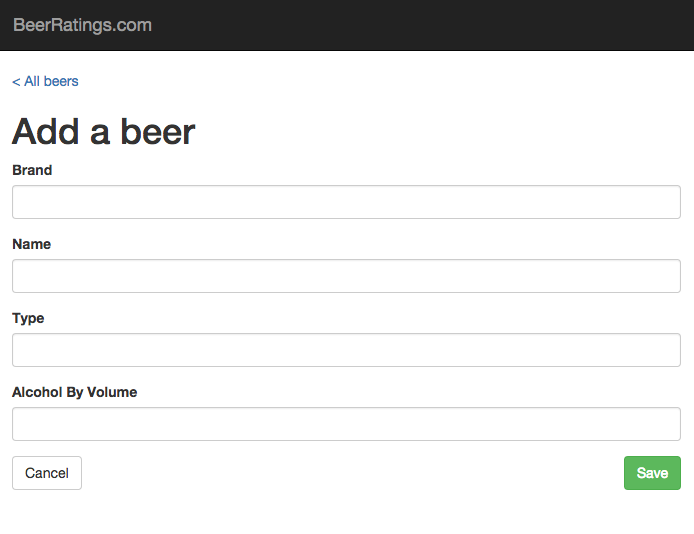
With all of the functional code abstracted into my Beer controller the view has become very straightforward. On top, if we are in edit more, I start with a form that handles manipulating the beer object. Because all of the smarts about what to do with a new document vs. an existing document are all handled, my view doesn’t care which is which! Now if I navigate to #/beers/new I should see the blank form.
I’ll add one of my favorite beers to see how everything works.
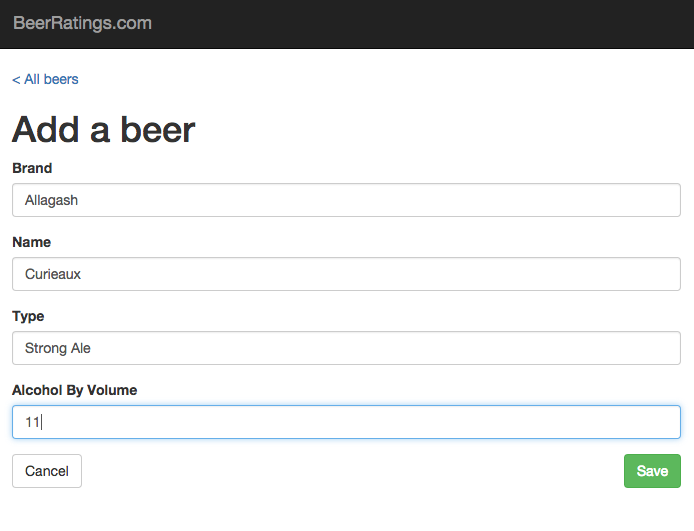
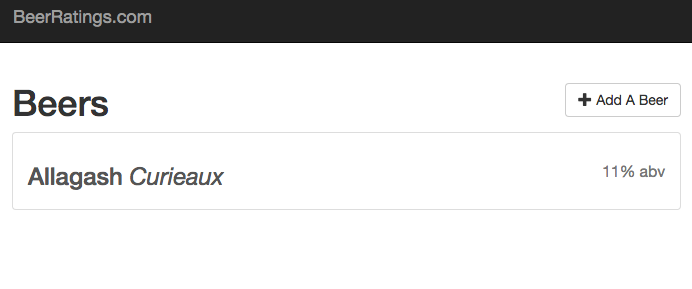
Saving the beer takes me back to the listing which now displays my new Beer.
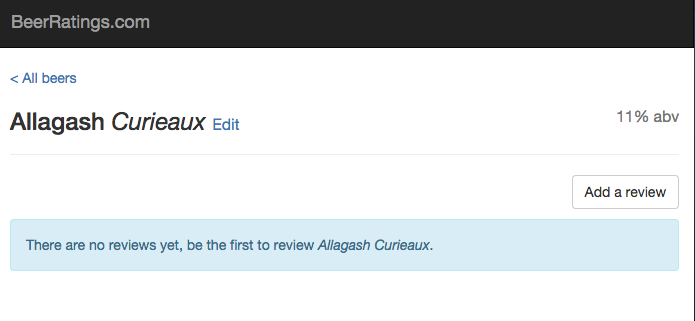
Then clicking the newly created beer from the listing should take me back to the beer detail page in read-only mode. Note the URL schema is pretty verbose ‘#/beer/Allagash_Curieaux.’
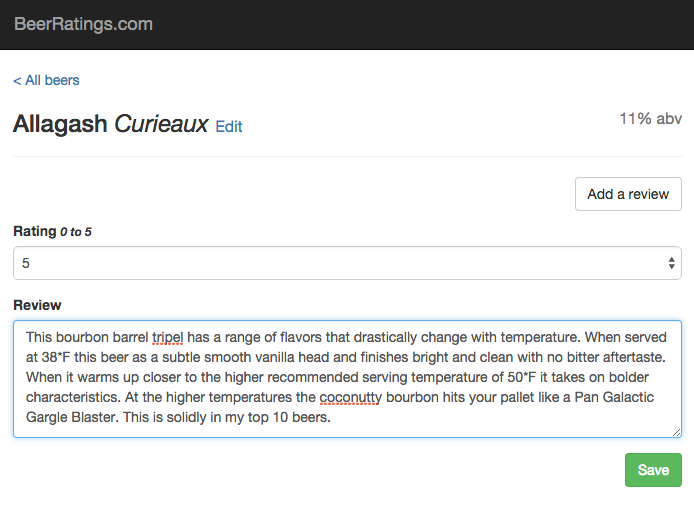
The next part of my view deals with the creation of new reviews on my beer object. If the scope level variable ‘review’ is not false, we know the user is creating a review, so the review form is rendered.
I’ll save the review to see that everything has gone well.
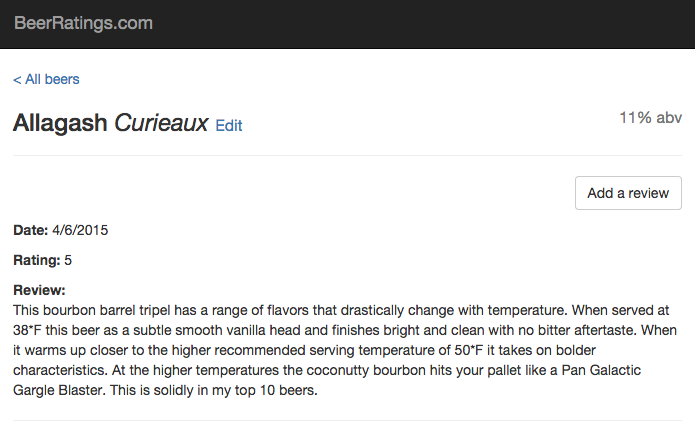
Hello World! Everything works as expected.
REMINDER
This application is NOT fit for production for several reasons. We have done no validation on the input fields, so users could provide whatever crap they can (and would) think of. Also, having reviews as a part of Beer object causes what would be an annoying issue in production. Since the reviews are not separate documents if 2 people were to add reviews at the same time, the second user’s review would be rejected because the database is enforcing the version based off of the whole beer object. Every time the beer object is saved in the database, it is incrementing the _rev property. In production we would fix this by making reviews their own document and probably retrieving them with a view.
Conclusion
Smartly using AngularJS with the ngResource provider and integrating directly to a CouchDB instance, developers can rapidly prototype working applications just about as fast as creating a stale visual only mockup. The added benefit of having a working prototype is that user testing can begin before work on the production application even begins. By abstracting our logic into angular components we also have the benefit that much of the code can probably be used in the production application as well.
