React vs. Vue vs. Angular Showdown Part 1 React
Tim Williams • December 3, 2020

Showdown Part One -- REACT
Angular, Vue and React all have command line tools and this is what we should expect from any modern web tool.
Step 1 install the project
npx create-react-app weather
React creates a folder with a templated package.json and installs React as well as creates a few scripts which I can run to build or serve my application locally in 'watch' mode where any changes to the files I make will result in a browser reload. I use the serve script to spin up my local environment.
npm run start
In the src/App.js file I clean out the templated code so that it looks like this:
function App() {
  return (
    <div className="App">

    </div>
  );
}
Now I can break my requirements down into what I need to store in state. I need a field to hold the city name that is either prepopulated on load, or updated by the user. I need a property to hold the input from the user, and a property to hold the response from the API.
My state ends up looking like this:
{
  "cityInput": "",
  "requestHistory": [],
  "weatherHistory": []
}
The simplest thing to do in React is to store that state in the highest component. I know my app component will be a little more complex so I change it to a class and add the state.
class App extends React.Component {
  constructor(props) {
    super(props);
    this.state = {
      cityInput: "",
      requestHistory: [],
      weatherHistory: []
    };
  }
  render() {
    return (
      <div className="App">

      </div>
    );
  }
}
Step 2 setup state and defaults
Next, I will address the requirement that the weather defaults to the user's current location (if available). I can use the browser's built in geolocation API to do this. The API is simple enough that I decide not to split it off as a service.
Modifying my app I add a method getLocalLocation() to handle the request to the browser API and the push into the state of the application. To default this behavior on load, I add a lifecycle hook into componentDidMount() to fire this off on load. My root application now looks like this: JS Fiddle
class App extends React.Component {
  constructor(props) {
    super(props);
    this.state = {
      cityInput: "",
      requestHistory: [],
      weatherHistory: []
    };
  }
  async componentDidMount() {
    await this.getLocalLocation();
  }
  getLocalLocation() {
    return navigator.geolocation.getCurrentPosition(pos => {
      this.setState({
        requestHistory: this.state.requestHistory.concat([{
          lat: pos.coords.latitude,
          lon: pos.coords.longitude
        }])
      });
    });
  }
  render() {
    return (
      <div className="App">
        {JSON.stringify(this.state.requestHistory)}
      </div>
    );
  }
}
Just to make sure that I have things working correctly, I print out the requestHistory into the DOM. Run the code above in the fiddle and you'll see something like:
[{"lat":38.6760704,"lon":-120.9499648}]
Step 3 create a service with adaptor
Next up I am going to make a reusable service that I can import to fetch my weather data from an API. For my API I choose to use OpenWeather because they have a free tier that's pretty easy to get setup and running.
class OpenWeatherService {
  constructor() {
    this.appid = '...';
    this.apiDomain = 'https://api.openweathermap.org/data/2.5/';
  }
  async getWeatherForGeo(lon, lat) {
    let endpointUrl = new URL(this.apiDomain);
    endpointUrl.pathname += 'weather';
    endpointUrl.search = new URLSearchParams({
      appid: this.appid,
      lat: lat,
      lon: lon,
      units: "imperial"
    });
    let response = await fetch(endpointUrl.toString());
    let json = await response.json();
    return json;
  }
  async getWeatherForCity(city) {
    let endpointUrl = new URL(this.apiDomain);
    endpointUrl.pathname += 'weather';
    endpointUrl.search = new URLSearchParams({
      appid: this.appid,
      q: city,
      units: "imperial"
    });
    let response = await fetch(endpointUrl.toString());
    let json = await response.json();
    return json;
  }
}
Next, I am going to make an adapter. An adaptor is necessary because if in the future I want to swap out my API service, I don't want my view and data models to be tightly coupled to the output format of the data service. Based on my specs, I know what I need. My adapter should take as input, the output from the API and return this:
{
  "locale": String,
  "currentTemp": Int,
  "high": Int,
  "low": Int,
  "condition": String
}
I also want to be able to deal with errors at the adaptor level. So my response can come in a second flavor:
{
  "error": String
}
Based on the API I know the output looks like this, for a success response:
{
  "coord": {
    "lon": -122.08,
    "lat": 37.39
  },
  "weather": [
    {
      "id": 800,
      "main": "Clear",
      "description": "clear sky",
      "icon": "01d"
    }
  ],
  "base": "stations",
  "main": {
    "temp": 78.55,
    "feels_like": 80.86,
    "temp_min": 55.37,
    "temp_max": 84.26,
    "pressure": 1023,
    "humidity": 100
  },
  "visibility": 16093,
  "wind": {
    "speed": 1.5,
    "deg": 350
  },
  "clouds": {
    "all": 1
  },
  "dt": 1560350645,
  "sys": {
    "type": 1,
    "id": 5122,
    "message": 0.0139,
    "country": "US",
    "sunrise": 1560343627,
    "sunset": 1560396563
  },
  "timezone": -25200,
  "id": 420006353,
  "name": "Mountain View",
  "cod": 200
}
Likewise my response to a failed request to the API will look like this:
{
  "cod": 429,
  "message": "You exceeded your API limit per minute. Please pay us a lot of money!"
}
But my adapter will translate that to a user friendly error message:
{
  "error": "We are temporarily unable to get weather data. Please check back soon."
}
Let me pause here for a second to explain why I think an adapter is an important architectural concern. When building the weather service that fetches results from the API, I want to be able to reuse that logic in other applications. That means my weather service should be concerned simply with fetching results from the specific API it is designed for. The adaptor insulates my base application from the dirtiness of translating the data coming from the API into a format my view will use.
Let's say down the line, my app becomes popular and I don't want to pay anything for deeper API access. If I didn't build an adaptor, and I simply used the format of data that came from the API call to Open Weather, I would have to either rewrite my front-end logic to handle another format, or I would have to make an adaptor for the new endpoint to translate the data into the arbitrary structure I committed to with the first API. Then in the future when I look back over the code, it won't be immediately obvious to me why the data is structure the way it is.
Using the adapter pattern I can integrate as many weather APIs as I want, and all I have to do is implement the same output from my adapter for each API! I can even use this pattern to allow for failover. If my API requests to Open Weather hit a status "429 Too Many Requests" I can rotate to another adapter and use another service until I run out of options.
Now for the adapter. The interface I use for this is what I will commit to for any future adapters, so it needs to be clean and easy to understand.
class OpenWeatherAdaptor {
  translateOutput(response) {
    if( response.message ) {
      return {
        error: "We are temporarily unable to get weather data, please check back soon!"
      }
    } else {
      return {
        locale: response.name,
        currentTemp: response.main.temp,
        high: response.main.temp_max,
        low: response.main.temp_min,
        condition: response.weather[0].description
      }
    }
  }
  async getWeather(byWhat, args) {
    const ws = new OpenWeatherService();
    let response;
    if( byWhat == 'city' ) {
      response = await ws.getWeatherForCity(...args);
    } else {
      response = await ws.getWeatherForGeo(...args);
    }
    return this.translateOutput(response);
  }
}
Putting these two together I an run a little test to see if it works. To make this fiddle work, you'll need to plunk in some API credentials.
(new OpenWeatherAdaptor())
  .getWeather('city', ['Mountain View'])
  .then(weather => console.log(weather));
Without the API credentials, you get a nice user friendly error message.
{
  "error": "We are temporarily unable to get weather data, please check back soon!"
}
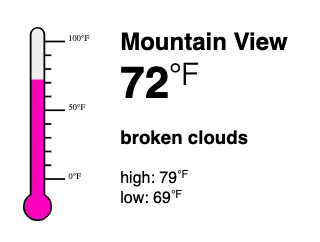
With API credentials plugged in you get the data back in a nicely packaged in the format I want. It looks like this.
{
    "locale": "Mountain View",
    "currentTemp": 46.36,
    "high": 48.99,
    "low": 44.01,
    "condition": "broken clouds"
}
Step 4 connect the service to the app
Now I am ready to plug it into my application. I add a new async method getWeather() and fire it off after getting the local location.
class App extends React.Component {
  constructor(props) {
    super(props);
    this.state = {
      cityInput: "",
      requestHistory: [],
      weatherHistory: []
    };
  }
  async componentDidMount() {
    await this.getLocalLocation();
  }
  getLocalLocation() {
    return navigator.geolocation.getCurrentPosition(pos => {
      this.setState({
        requestHistory: this.state.requestHistory.concat([{
          lat: pos.coords.latitude,
          lon: pos.coords.longitude
        }])
        this.getWeather();
      });
    });
  }
  async getWeather() {
    if( this.state.requestHistory.length ) {
      const req = this.state.requestHistory[this.state.requestHistory.length - 1];
      const wa = new WeatherAdaptor();
      const response = await wa.getWeather(req.byWhat, req.params);
      this.setState({
        weatherHistory: this.state.weatherHistory.concat([response])
      });
    }
  }
  render() {
    return (
      <div className="App">
        {JSON.stringify(this.state.weatherHistory)}
      </div>
    );
  }
}
Step 5 refine UI state
At this point I'm starting to realize that my application is going to be in a few general states.
- Empty, no data to render.
- Loading, getting new data from the API.
- Ready, there's data to render the weather.
- Error, something went wrong fetching the data.
To make component rendering easier I want to keep track of these general states in the root state for the application. So I add a property 'viewState' to my App component's state and default it to empty.
this.state = {
  viewState: "empty",
  cityInput: "",
  requestHistory: [],
  weatherHistory: []
};
I don't want to display my weather component if there's no data to bind to it. I also want to show some sort of loading spinner when my application is fetching data so that the user knows there's something going on. This adds a lot of conditional rendering logic to my view. React expects you to execute this logic in JavaScript or in JSX. Using conditional statements in JSX is hard to follow, so I will opt for using a set of render functions instead.
First I'll add a loading function and return a JSX SVG that has the animation built into it.
renderLoadingSpinner() {
  if( this.state.viewState === 'loading' ) {
    return <svg width="38" height="38" viewBox="0 0 38 38" xmlns="http://www.w3.org/2000/svg">
      <defs>
        <linearGradient x1="8.042%" y1="0%" x2="65.682%" y2="23.865%" id="a">
          <stop stopColor="#fff" stopOpacity="0" offset="0%"/>
          <stop stopColor="#fff" stopOpacity=".631" offset="63.146%"/>
          <stop stopColor="#fff" offset="100%"/>
        </linearGradient>
      </defs>
      <g fill="none" fillRule="evenodd">
        <g transform="translate(1 1)">
          <path d="M36 18c0-9.94-8.06-18-18-18" id="Oval-2" stroke="#000" strokeWidth="2">
            <animateTransform
              attributeName="transform"
              type="rotate"
              from="0 18 18"
              to="360 18 18"
              dur="0.9s"
              repeatCount="indefinite" />
          </path>
          <circle fill="#fff" cx="36" cy="18" r="1">
            <animateTransform
              attributeName="transform"
              type="rotate"
              from="0 18 18"
              to="360 18 18"
              dur="0.9s"
              repeatCount="indefinite" />
          </circle>
        </g>
      </g>
    </svg>
  }
}
I also add a function that I will extend with a new component soon to render the latest API response, or in the case of an error from the API, I will show a simple error message in the place of the weather display.
renderWeatherDisplay() {
  if( this.state.viewState === 'ready' ) {
    const currentWeather = this.state.weatherHistory[this.state.weatherHistory.length - 1];
    return JSON.stringify(currentWeather);
  } else if ( this.state.viewState === 'error' ) {
    const errorState = this.state.weatherHistory[this.state.weatherHistory.length - 1];
    return <p className="error">{errorState.error}</p>
  }
}
I then add a few state modifiers to my function getWeather() that will kick the application into loading, and ready states when the data becomes available, or in an error state if we get an error back from the API. When we put it all together it looks like this.
class App extends React.Component {
  constructor(props) {
    super(props);
    this.state = {
      viewState: 'empty',
      cityInput: '',
      requestHistory: [],
      weatherHistory: []
    };
  }
  async componentDidMount() {
    await this.getLocalLocation();
  }
  getLocalLocation() {
    return navigator.geolocation.getCurrentPosition(pos => {
      this.setState({
        requestHistory: this.state.requestHistory.concat([{
          byWhat: 'geo',
          params: [pos.coords.longitude, pos.coords.latitude]
        }])
      });
      this.getWeather();
    });
  }
  async getWeather() {
    if( this.state.requestHistory.length ) {
      this.setState({
        viewState: 'loading'
      });
      const req = this.state.requestHistory[this.state.requestHistory.length - 1];
      const wa = new WeatherAdaptor();
      const response = await wa.getWeather(req.byWhat, req.params);
      this.setState({
        weatherHistory: this.state.weatherHistory.concat([response])
      });
      if(typeof response.error === 'undefined' ) {
        this.setState({
          viewState: 'ready'
        });
      } else {
        this.setState({
          viewState: 'error'
        });
      }
    }
  }
  renderWeatherDisplay() {
    if( this.state.viewState === 'ready' ) {
      const currentWeather = this.state.weatherHistory[this.state.weatherHistory.length - 1];
      return
    } else if ( this.state.viewState === 'error' ) {
      const errorState = this.state.weatherHistory[this.state.weatherHistory.length - 1];
      return <p className="error">{errorState.error}</p>
    }
  }
  renderLoadingSpinner() {
    if( this.state.viewState === 'loading' ) {
      return <svg width="38" height="38" viewBox="0 0 38 38" xmlns="http://www.w3.org/2000/svg">
        <defs>
          <linearGradient x1="8.042%" y1="0%" x2="65.682%" y2="23.865%" id="a">
            <stop stopColor="#fff" stopOpacity="0" offset="0%"/>
            <stop stopColor="#fff" stopOpacity=".631" offset="63.146%"/>
            <stop stopColor="#fff" offset="100%"/>
          </linearGradient>
        </defs>
        <g fill="none" fillRule="evenodd">
          <g transform="translate(1 1)">
            <path d="M36 18c0-9.94-8.06-18-18-18" id="Oval-2" stroke="#000" strokeWidth="2">
              <animateTransform
                attributeName="transform"
                type="rotate"
                from="0 18 18"
                to="360 18 18"
                dur="0.9s"
                repeatCount="indefinite" />
            </path>
            <circle fill="#fff" cx="36" cy="18" r="1">
              <animateTransform
                attributeName="transform"
                type="rotate"
                from="0 18 18"
                to="360 18 18"
                dur="0.9s"
                repeatCount="indefinite" />
            </circle>
          </g>
        </g>
      </svg>
    }
  }
  render() {
    return (
      <div className="App">
        {this.renderLoadingSpinner()}
        {this.renderWeatherDisplay()}
      </div>
    );
  }
}
Next comes the fun part. I'll make the new component responsible for displaying the weather. As input it will take the standardized object I am creating with my adapter. I'll use an SVG image to display the temperature in a gauge and I'll clean up and print out the rest of the information.
For an SVG I searched for a free licensed temperature gauge and found this.
The SVG XML looks like this.
<svg xmlns:rdf="http://www.w3.org/1999/02/22-rdf-syntax-ns#" xmlns="http://www.w3.org/2000/svg" xmlns:cc="http://web.resource.org/cc/" xmlns:dc="http://purl.org/dc/elements/1.1/" xmlns:svg="http://www.w3.org/2000/svg" id="svg2" viewBox="0 0 256 512" version="1.0"
style="max-width: 120px">
<g id="layer1">
<g id="g3030">
<g id="g2984" stroke="#000" stroke-width="4" fill="none">
<path id="path2931" d="m80 64h48"/>
<path id="path2935" d="m80 384h48"/>
<path id="path2937" d="m80 224h48"/>
<path id="path2939" d="m80 192h16"/>
<path id="path2941" d="m80 160h16"/>
<path id="path2943" d="m80 128h16"/>
<path id="path2945" d="m80 96h16"/>
<path id="path2947" d="m80 256h16"/>
<path id="path2949" d="m80 288h16"/>
<path id="path2951" d="m80 320h16"/>
<path id="path2953" d="m80 352h16"/>
</g>
<g id="g3023">
<rect id="rect2922" rx="16" ry="16" height="416" width="32" y="32" x="48" fill="#eeeeec"/>
<rect id="rect3021" rx="0" ry="0" height="64" width="32" y="384" x="48" fill="#c00"/>
<path id="path2924" fill="#c00" d="m96 448a32 32 0 1 1 -64 0 32 32 0 1 1 64 0z"/>
<rect id="mercury" transform="scale(-1 -32)" rx="0" ry="0" height="10" width="32" y="-12" x="-80" fill="#c00"/>
<path id="rect2968" stroke-linejoin="round" d="m64 32c-8.864 0-16 7.136-16 16v372.28c-9.564 5.54-16 15.88-16 27.72 0 17.66 14.336 32 32 32s32-14.34 32-32c0-11.84-6.436-22.18-16-27.72v-372.28c0-8.864-7.136-16-16-16z" stroke="#000" stroke-linecap="round" stroke-width="4" fill="none"/>
</g>
<text id="low" font-size="20px" xml:space="preserve" transform="scale(.99840 1.0016)" y="383.38419" x="136.21846" font-family="Bitstream Vera Sans" line-height="125%" fill="black">
<tspan id="tspan3003" y="383.38419" x="136.21846">Foo</tspan>
</text>
<text id="middle" font-size="20px" xml:space="preserve" line-height="125%" y="224" x="136" font-family="Bitstream Vera Sans" fill="black">
<tspan id="tspan3011" y="224" x="136">Bar</tspan>
</text>
<text id="high" font-size="20px" xml:space="preserve" line-height="125%" y="63.830078" x="135.32617" font-family="Bitstream Vera Sans" fill="black">
<tspan id="tspan3007" y="63.830078" x="135.32617">Baz</tspan>
</text>
</g>
</g>
<metadata>
<rdf:RDF>
<cc:Work>
<dc:format>image/svg+xml</dc:format>
<dc:type rdf:resource="http://purl.org/dc/dcmitype/StillImage"/>
<cc:license rdf:resource="http://creativecommons.org/licenses/publicdomain/"/>
<dc:publisher>
<cc:Agent rdf:about="http://openclipart.org/">
<dc:title>Openclipart</dc:title>
</cc:Agent>
</dc:publisher>
<dc:title>thermometer</dc:title>
<dc:date>2006-11-05T22:51:06</dc:date>
<dc:description>A simple thermometer image suitable for generating different version programmatically. Here's an example generator in sh script:
\n
\nf () {
\n sed -e "s/height=\\"10\\"/height=\\"$1\\"/" \\
\n -e "s/Foo/$2/" \\
\n -e "s/Bar/$3/" \\
\n -e "s/Baz/$4/" \\
\n thermometer.svg |
\n rsvg-convert -o thermometer.png
\n}</dc:description>
<dc:source>http://openclipart.org/detail/1309/thermometer-by-twb</dc:source>
<dc:creator>
<cc:Agent>
<dc:title>twb</dc:title>
</cc:Agent>
</dc:creator>
<dc:subject>
<rdf:Bag>
<rdf:li>clip art</rdf:li>
<rdf:li>clipart</rdf:li>
<rdf:li>cold</rdf:li>
<rdf:li>hot</rdf:li>
<rdf:li>remix problem</rdf:li>
<rdf:li>temperature</rdf:li>
<rdf:li>thermometer</rdf:li>
<rdf:li>tool</rdf:li>
</rdf:Bag>
</dc:subject>
</cc:Work>
<cc:License rdf:about="http://creativecommons.org/licenses/publicdomain/">
<cc:permits rdf:resource="http://creativecommons.org/ns#Reproduction"/>
<cc:permits rdf:resource="http://creativecommons.org/ns#Distribution"/>
<cc:permits rdf:resource="http://creativecommons.org/ns#DerivativeWorks"/>
</cc:License>
</rdf:RDF>
</metadata>
</svg>
Step 6 stateless view!
Looking through this SVG I can pick out how the temperature gauge is applied. The (aptly named) rectangle with the id of mercury is where the magic is. The height is applied on a scale of 1-10. To make this project ridiculously simple, I am going to constrain my scale from 0°F to 100°F. So I can take my Fahrenheit temperature and multiply it by one tenth to get the height.
convertTempToHeight() {
    return this.props.weatherData.currentTemp * .1
  }
Next I'm going to give the gauge a tiny bit of extra flare. I will use an HSL color range to represent the temperature.
percentageToColor() {
  const hue = 200 + (160 * ( this.props.weatherData.currentTemp / 100 ));
  return `hsl(${hue}, 100%, 50%)`;
}
I found this nifty tool to easily convert the SVG into JSX. Now I can put this all together into my stateless weather component.
class Weather extends React.Component {
  convertTempToHeight() {
    return this.props.weatherData.currentTemp * .1
  }
  percentageToColor() {
    const hue = 200 + (160 * ( this.props.weatherData.currentTemp / 100 ));
    return `hsl(${hue}, 100%, 50%)`;
  }
  render() {
    return (
      <div className="wrap">
        <div className="thermometer">
          <svg xmlns="http://www.w3.org/2000/svg" version="1" viewBox="0 0 256 512">
            <g>
              <g>
                <g fill="none" stroke="#000" strokeWidth="4">
                  <path d="M80 64h48"></path>
                  <path d="M80 384h48"></path>
                  <path d="M80 224h48"></path>
                  <path d="M80 192h16"></path>
                  <path d="M80 160h16"></path>
                  <path d="M80 128h16"></path>
                  <path d="M80 96h16"></path>
                  <path d="M80 256h16"></path>
                  <path d="M80 288h16"></path>
                  <path d="M80 320h16"></path>
                  <path d="M80 352h16"></path>
                </g>
                <g>
                  <rect
                    width="32"
                    height="416"
                    x="48"
                    y="32"
                    fill="#eeeeec"
                    rx="16"
                    ry="16"
                  ></rect>
                  <rect
                    width="32"
                    height="64"
                    x="48"
                    y="384"
                    fill={this.percentageToColor()}
                    rx="0"
                    ry="0"
                  ></rect>
                  <path
                    fill={this.percentageToColor()}
                    d="M96 448a32 32 0 11-64 0 32 32 0 1164 0z"
                  ></path>
                  <rect
                    width="32"
                    height={this.convertTempToHeight()}
                    x="-80"
                    y="-12"
                    fill={this.percentageToColor()}
                    rx="0"
                    ry="0"
                    transform="scale(-1 -32)"
                  ></rect>
                  <path
                    fill="none"
                    stroke="#000"
                    strokeLinecap="round"
                    strokeLinejoin="round"
                    strokeWidth="4"
                    d="M64 32c-8.864 0-16 7.136-16 16v372.28c-9.564 5.54-16 15.88-16 27.72 0 17.66 14.336 32 32 32s32-14.34 32-32c0-11.84-6.436-22.18-16-27.72V48c0-8.864-7.136-16-16-16z"
                  ></path>
                </g>
                <text
                  x="136.218"
                  y="383.384"
                  fill="#000"
                  fontFamily="Bitstream Vera Sans"
                  fontSize="20"
                  transform="scale(.9984 1.0016)"
                  xmlSpace="preserve"
                >
                  <tspan x="136.218" y="383.384">
                    0°F
                  </tspan>
                </text>
                <text
                  x="136"
                  y="224"
                  fill="#000"
                  fontFamily="Bitstream Vera Sans"
                  fontSize="20"
                  xmlSpace="preserve"
                >
                  <tspan x="136" y="224">
                    50°F
                  </tspan>
                </text>
                <text
                  x="135.326"
                  y="63.83"
                  fill="#000"
                  fontFamily="Bitstream Vera Sans"
                  fontSize="20"
                  xmlSpace="preserve"
                >
                  <tspan x="135.326" y="63.83">
                    100°F
                  </tspan>
                </text>
              </g>
            </g>
          </svg>
        </div>
        <div className="readout">
          <h2>{this.props.weatherData.locale}</h2>
          <h1>{Math.round(this.props.weatherData.currentTemp)}<small><sup>°F</sup></small></h1>
          <h3>{this.props.weatherData.condition}</h3>
          <p>
            <span>high: {Math.round(this.props.weatherData.high)}<small><sup>°F</sup></small></span><br />
            <span>low: {Math.round(this.props.weatherData.low)}<small><sup>°F</sup></small></span>
          </p>
        </div>
      </div>
    )
  }
}
The beauty of my stateless component is that I can test it easily by creating a mock input to initialize the props and see what it does without the rest of the application!
Next I toss in a little styling to clean up the look a bit, and violà, I've got something that looks nice. Take a look at the fiddle for the component.
#root {
  display: flex;
  justify-content: center;
  align-items: center;
  min-height: 100vh;
  font-family: sans-serif;
}

.wrap {
  display: flex;
  align-items: center;
}

.readout {
  text-align: left;
}

.readout h1, .readout h2 {
  margin: 0;
}

.readout h1 {
  font-size: 2.75em;
  font-weight: 900;
}

.readout h1 sup {
  font-weight: 300;
}

.thermometer {
  width: 110px;
}
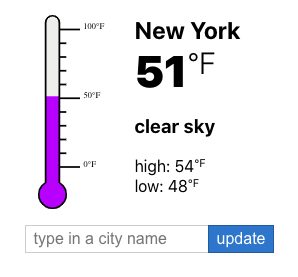
Step 7 the input component
Last but not least I need to make a component to allow users to type in their city and query the API for results. I want to do all of the things that you expect from a modern single input webform and allow submit on enter, or button click as well as disable changes while AJAX is fetching results.
Here we deal with event capturing to handle the changing state of the input. We only want the API to be hit when the user intentionally tries to get results, and in this case I consider that either clicking [update] or pressing enter.
The CityInput component.
class CityInput extends React.Component {
  constructor(props) {
    super(props);
    this.state = {
      value: ''
    };
    this.handleSubmit = this.handleSubmit.bind(this);
  }

  handleChange(event) {
    this.setState({value: event.target.value});
  }

  handleSubmit(event) {
    event.preventDefault();
    if( this.state.value.trim().length ) {
      this.props.updateCity(this.state.value);
    }
  }

  render() {
    return (
      <form onSubmit={this.handleSubmit}>
        <input type="text"
          value={this.state.value}
          onChange={event => this.handleChange(event)}
          onKeyPress={event => {
            if (event.key === 'Enter') {
              this.handleSubmit(event)
            }
          }}
          placeholder="type in a city name" />
        <input type="submit" value="update" />
      </form>
    );
  }
}
From our app component we add a new render method to put this component on the page when the app isn't in a loading or error state.
renderCityInput() {
  if( this.state.viewState === 'empty' || this.state.viewState === 'ready' ) {
    return <CityInput updateCity={(city) => this.updateCity(city)} />
  }
}
Then the App's render function is updated to look like this.
render() {
  return (
    <div className="App">
      {this.renderLoadingSpinner()}
      {this.renderWeatherDisplay()}
      {this.renderCityInput()}
    </div>
  );
}
Add a little styling to the form and we're looking good.
form {
  display: flex;
}

input, button {
  font-size: 1em;
  padding: .25rem .5rem;
  border-radius: 0;
}

input[type="text"] {
  border: 1px solid #ccc;
  border-right: 0;
  flex-grow: 1;
}

input[type="submit"], button {
  border: 1px solid #005c9e;
  background-color: #0077cc;
  color:white;
}
Here's a look at our completed app component.
class App extends React.Component {
  constructor(props) {
    super(props);
    this.state = {
      viewState: 'empty',
      cityInput: '',
      requestHistory: [],
      weatherHistory: []
    };
  }
  async componentDidMount() {
    await this.getLocalLocation();
  }
  getLocalLocation() {
    return navigator.geolocation.getCurrentPosition(pos => {
      this.setState({
        requestHistory: this.state.requestHistory.concat([{
          byWhat: 'geo',
          params: [pos.coords.longitude, pos.coords.latitude]
        }])
      });
      this.getWeather();
    });
  }
  async getWeather() {
    if( this.state.requestHistory.length ) {
      this.setState({
        viewState: 'loading'
      });
      const req = this.state.requestHistory[this.state.requestHistory.length - 1];
      const wa = new WeatherAdaptor();
      const response = await wa.getWeather(req.byWhat, req.params);
      this.setState({
        weatherHistory: this.state.weatherHistory.concat([response])
      });
      if(typeof response.error === 'undefined' ) {
        this.setState({
          viewState: 'ready'
        });
      } else {
        this.setState({
          viewState: 'error'
        });
      }
    }
  }
  renderWeatherDisplay() {
    if( this.state.viewState === 'ready' ) {
      const currentWeather = this.state.weatherHistory[this.state.weatherHistory.length - 1];
      return <Weather weatherData={currentWeather} />;
    } else if ( this.state.viewState === 'error' ) {
      const errorState = this.state.weatherHistory[this.state.weatherHistory.length - 1];
      return (
        <div>
          <p className="error">{errorState.error}</p>
          <button onClick={event => this.goBack()}>go back</button>
        </div>
      )
    }
  }
  goBack() {
    if( this.state.weatherHistory.length > 1 ) {
      let newState = [...this.state.weatherHistory];
      newState.pop();
      this.setState({
        weatherHistory: newState,
        viewState: typeof newState[newState.length - 1].currentTemp !== 'undefined' ? 'ready' : 'empty'
      });
    }
  }
  renderLoadingSpinner() {
    if( this.state.viewState === 'loading' ) {
      return <svg width="38" height="38" viewBox="0 0 38 38" xmlns="http://www.w3.org/2000/svg">
        <defs>
          <linearGradient x1="8.042%" y1="0%" x2="65.682%" y2="23.865%" id="a">
            <stop stopColor="#fff" stopOpacity="0" offset="0%"/>
            <stop stopColor="#fff" stopOpacity=".631" offset="63.146%"/>
            <stop stopColor="#fff" offset="100%"/>
          </linearGradient>
        </defs>
        <g fill="none" fillRule="evenodd">
          <g transform="translate(1 1)">
            <path d="M36 18c0-9.94-8.06-18-18-18" id="Oval-2" stroke="#000" strokeWidth="2">
              <animateTransform
                attributeName="transform"
                type="rotate"
                from="0 18 18"
                to="360 18 18"
                dur="0.9s"
                repeatCount="indefinite" />
            </path>
            <circle fill="#fff" cx="36" cy="18" r="1">
              <animateTransform
                attributeName="transform"
                type="rotate"
                from="0 18 18"
                to="360 18 18"
                dur="0.9s"
                repeatCount="indefinite" />
            </circle>
          </g>
        </g>
      </svg>
    }
  }
  updateCity(city) {
    this.setState({
      requestHistory: this.state.requestHistory.concat([{
        byWhat: 'city',
        params: [city]
      }])
    });
    setTimeout(() => {
      this.getWeather();
    });
  }
  renderCityInput() {
    if( this.state.viewState === 'empty' || this.state.viewState === 'ready' ) {
      return <CityInput updateCity={(city) => this.updateCity(city)} />
    }
  }
  render() {
    return (
      <div className="App">
        {this.renderLoadingSpinner()}
        {this.renderWeatherDisplay()}
        {this.renderCityInput()}
      </div>
    );
  }
}
Get a working version of this application from my Git Repo.
How does it score?
I'm going to rank this project based on the SOLID principles and the overall developer experience.
Single Responsibility Principle
Developers tend to get this one wrong pretty frequently. The common misconception is that this principle is meant to be applied to technology. For instance the separation of responsibilities in an MVC. The correct interpretation is that you should build components that reflect the responsibilities of the users.
For example; let's say you are building an web application for a pet store's online sales. You'll be working with products, orders, invoices, and stock numbers. Every user of this system will touch all of these basic 'objects' however, the representation of each of these objects will be different depending on who the user is. Accounting will need access to orders and invoices, but they'll need special tools for calculating sales and tallying. Fullfilment users will need access to orders, products, but they'll need special tools for locating products and adjusting stock numbers. Customers will need a completely different representation as well.
From a application development perspective, this means that your UI will have at least three different representations of all of the data types. From the perspective of a React developer, this means that you might have three groups of components (possibly even three completely separate apps) that deal with the same underlying objects, but expose different tools.
To bring it back to the principle. The reason for change in each of these groups is the roles of the users. If finance needs a change to the way a product is represented, you as the developer should not have to think about how that change impacts customers or order fulfillment users. Therefore the code is built around the reason for change, so when a change is requested, it is contained within the scope of the users asking for the change.
Sorry for the diatribe, let's get back to how React performs with the SRP. My conclusion is that React is true to it's word. It does not have an opinion on how this principle should be observed leaving it up to the developer to decide how best to model the application. It is also no harder than vanilla Javascript to segment these potential verticals into groups of components or separate applications if the need be.
So, React provides no help, but doesn't get in the way either. I give that a seven out of ten.
Open-closed Principle
Bertrand Meyer wrote in Object-Oriented Software Construction in 1988 that "software entities (classes, modules, functions, etc.) should be open for extension, but closed for modification." We were able to demonstrate this principle nicely in this micro application via the use of the adaptor pattern for fetching data, and the agreement we made with the 'Weather' component on how the data should be structured in order to display.
This means that the core application doesn't need to be changed to add a new API provider. We can simply create a new provider and adaptor and plug it into the application, allowing it to be extended without modification.
Like SRP though, React has no opinion on how you should implement this pattern with the exception of stateless components. Since a stateless component has a fixed input, it always provides predictable output. The place where I believe React gets this wrong is in the component's interfaces. There is no popular convention in React world on how to define and validate 'props.' Props are to components as arguments are to functions.
To Paraphrase Robert Martin, he said that one of the biggest advancements that we can make in software development is the tools. Most modern languages have some sort of IDE that assists the developer in the process of interfacing with the code. Typehinting is one of the conventions that has allowed IDEs to become extremely precise in putting the information of function and class definitions, variable types, parameter orders right at the fingertips of the developer so that s/he doesn't have to constantly switch between files to remember the order of parameters.
Type definitions also provide the benefit of catching errors earlier and more accurately. If your double gets converted to a string and concatenated to another string instead of added to an integer, wouldn't it be handy to know that at the interface of your function? The problem with React is the same as the problem with Javascript, so React cannot be faulted directly for the existence of this issue. It can however, be faulted for not having a widely recognised solution to this issue. Both Angular and Vue have solutions for this issue by way of convention.
For OCP, due to this ommission I give React a five out of ten.
Liskov Substitution Principle
The ability for components to be replaceable "without altering the correctness of the program" is demonstrated nicely here in two places. The first place is the API interface we were able to create using the adaptor pattern. The second is the Weather component that displays the output of the API responses. These components can be swapped out fairly easily as long as we observe the data structures we implemented.
The conventions React uses to support this principle are both in the downward data flow allowing components to implement any dependent component that agrees on props, as well as the structure of the components themselves being implementations of a React.Component type.
The interface between components in the form of props could be a little nicer if there was a common convention of type defining their structure. This would also allow for some nicer code hinting and a reference point that developers can look at to quickly grok the requirements for interfacing with a component. This comes in even nicer when you're working with a team of developers and you share common components.
For LSP React scores pretty well despite the lack of niceties that would make substitution easier.
Interface Segregation Principle
It's fairly obvious that with React you can build any interface for your application needs. You're also not restricted by Javascript on how you implement interfaces into your own groups of components or applications. So the best way to score this one is to score how React itself implements this principle. To score well, all of the components of React need to be import-on-demand. React should also allow you to use as much or as little of the React library as you want.
On this principle, react scores admirably. First of all, unlike Angular, React doesn't come with recommended state management libraries, routing, etc. This means that that React achieves the greatest level of segregation possible due to the fact that you can (and have to) decide what external libraries to import to build more complex projects.
In another fundamental way, React knocks it out of the park with ISP given the ability to create components easily that are stateless, that are simple functions without constructors all the way up to the complex classes that use lifecycle hooks. This means that every component of your application can be exactly as complex as it needs to be. The sample application here is extremely simple, with no routing, fairly limited state etc. which makes the project small not requiring many files, and not overcomplicating any of the interfaces.
ISP gets nine out of ten. The only point that gets knocked off is the fact that there are no officialy promoted or supported modules to abstract all of the complex functionality required to do routing, state management, input binding etc.
Dependency Inversion Principle
In modern web development, Dependency Injection is often conflated with the Dependency Inversion Principle when in reality DI is just an implementation of the DIP. There are very few modern front end Javascript frameworks that really intend to provide a solution for DIP, and the reason may be as simple as the fact that our front end code is not sufficiently complex yet (or often) to require the flexibility of and modularity that the common approaches to DIP provide.
I've also seen a lot of articles that misappropriate JavaScript module imports and the flexibility of the parameter interface that React exposes for components as Dependency Inversion. The standard React top down heirarchy of components is in fact very far from any sort of implementation of Dependency Inversion.
Top level components require concrete implementations of lower level components, which require a specific set of parameters to be defined in order to work properly. Now technically, lower level components can be constructed and inspected by just knowing what parameters they require for instantiation. In fact one invention that's become 'high fashion' in the React world, and helps to solve this problem is Storybook.
Storybook allows you to inflate your 'library' of components allowing you to do visual inspection testing and modification of your components in isolation apart from the dependencies they require to be used in your application. What Storybook highlights is actually the quality of encapsulation that you are able to achieve with React. The ability to modify and test your components in isolation is one of the benefits of the Dependency Inversion Principle, but Storybook is not an implementation of it.
For more complex front end applications, any place that they interact with APIs (any type for example HTTP, browser based, hardware based etc.) could benefit from dependency inversion in order to provide the ability to stub these services for testing, or to replace their implementing libraries when they become outdated, or requirements change.
React stays true to its philosophy here in that it does not provide a way to do dependency inversion, but it also doesn't get in my way if I want to implement a solution of my own. To fault React for this is akin to faulting a screwdriver for not being a power drill. This is one of the places where I feel like React's philosophy falls flat for the needs of a large majority of development teams. It's true that you can be clever and come up with your own solution, or look for a solution to import that will do this sort of thing for you, however, personally this is something I want a framework to solve for me. This type of problem in fact is a large reason why I use frameworks, and because of that I have to score React a pretty poor five out of ten for the Dependency Inversion Principle.
Conclusion
Yikes, thirty-four out of fifty does not sound like a good score! Part of the issue with this is that React can't be directly compared to other front end frameworks because it isn't the same. It doesn't attempt to solve many of the problems that these principles are meant to solve. It also doesn't get in my way of solving these problems myself.
A good framework attempts to solve these problems, because these problems are common requirements in development projects. This is why React hits a failing score here. I have called it a framework, when in fact it is a library. It is still useful to compare apples to oranges though, because it is important as a developer to know what problems each of these solutions seeks to solve.
In part 2 of this series we re-implement this application using Vue!