React vs. Vue vs. Angular Showdown Part 2 Vue
Tim Williams • December 17, 2020

Showdown Part Two Vue
Now we move on to Vue. Since we already defined the specifications, and we thought through most of the business logic in the React tutorial, we'll be diving right in to re-implementation.
Step 1 install
Vue's CLI is pretty similar to React's except I get a few more options. With Vue I am going to choose the latest stable product which is version 2, as well as use Typescript so that I can observe SOLID principles a little closer. With Typescript I can define interfaces. The beauty of this is that I can solidify the structure of the data that I settled on in the React tutorial.
Before we dive too far into that let's get started.
vue create vue-temp-gauge-example
The project skeleton looks pretty similar to the React project. You've got a /src directory where the project files are, plus the Vue CLI has gone a little further and installed my node_module dependencies. The environment is installed so I'll take a peak in the package.json file.
{
  "name": "vue-temp-gauge-example",
  "version": "0.1.0",
  "private": true,
  "scripts": {
    "serve": "vue-cli-service serve",
    "build": "vue-cli-service build",
    "lint": "vue-cli-service lint"
  },
  "dependencies": {
    "core-js": "^3.6.5",
    "vue": "^2.6.11"
  },
  "devDependencies": {
    "@vue/cli-plugin-babel": "~4.5.0",
    "@vue/cli-plugin-eslint": "~4.5.0",
    "@vue/cli-service": "~4.5.0",
    "babel-eslint": "^10.1.0",
    "eslint": "^6.7.2",
    "eslint-plugin-vue": "^6.2.2",
    "vue-template-compiler": "^2.6.11"
  }
}
We're looking at another pattern similar to react where you've got a few scripts baked in to make the development environment easy to work. When I'm building the project I can simply run npm run serve and access my application locally.
Step 2 Make the Skeleton
The React CLI gave me a little component to get started called HelloWorld.vue in the components folder, which is imported into the base application. I'll rename this to Weather.vue to keep consistent with our React version. Then I'll scoup out the guts to make it a fresh starting point.
<template>
  <div class="wrap">

  </div>
</template>

<script lang="ts">
import { Component, Prop, Vue } from 'vue-property-decorator'

@Component
export default class Weather extends Vue {

}
</script>

<!-- Add "scoped" attribute to limit CSS to this component only -->
<style scoped>

</style>
From this bare component we can already see that vue is giving us more functionality out of the box. Since Vue doesn't use JSX to render templates, we have a nice and easy to understand template in standard HTML. We also have a nice feature for applying styles. In the style tag there is the scoped property which allows us to contain CSS to this particular component. To do something similar in React, you must import an external dependency and learn a new syntax. Learn more about Styled Components Here.
With the shell of the weather component, I update the reference to the component in the App.vue file.
<template>
  <div id="app">
    <Weather />
  </div>
</template>

<script lang="ts">
import { Component, Vue } from 'vue-property-decorator'
import Weather from './components/Weather.vue'

@Component({
  components: {
    Weather
  }
})
export default class App extends Vue {}
</script>

<style>

</style>
Step 3 Define some Interfaces
One of the coolest things that I'm able to do with Typescript support for vue is solidify my date types into interfaces. First I make a folder inside of src called types. Then I make 4 files.
Weather.Interface.ts
export interface Weather {
  locale: string;
  currentTemp: number;
  high: number;
  low: number;
  condition: string;
}
WeatherError.Interface.ts
export interface WeatherError {
  error: string;
}
Search.Interface.ts
export interface SearchInterface {
  params: [string];
}
GeoQuery.Interface.ts
export interface GeoQueryInterface {
  params: [number, number];
}
This brings me one step closer to DIP because I have an abstraction that represents the data that will be powering my application, and will be agreed to in the output of my Weather Adapter as well as the input of my global state and Weather component. With those setup I can import them into the App.vue file and setup my data.
I'll also add a couple of 'computed' properties using class getters. These properties will allow me convenient access to the latest objects in the history arrays and will make the logic in my view much clearer.
<template>
  <div id="app">
    <Weather />
  </div>
</template>

<script lang="ts">
import { Component, Vue } from 'vue-property-decorator'
import Weather from './components/Weather.vue'
import { WeatherInterface } from './types/Weather.Interface'
import { WeatherErrorInterface } from './types/WeatherError.Interface'
import { GeoQueryInterface } from './types/GeoQuery.Interface'
import { SearchInterface } from './types/Search.Interface'

@Component({
  components: {
    Weather
  }
})
export default class App extends Vue {
  viewState = 'empty';
  requestHistory: Array<GeoQueryInterface | SearchInterface> = [];
  weatherHistory: Array<WeatherInterface | WeatherErrorInterface> = [];

  get lastRequest (): GeoQueryInterface | SearchInterface | null {
    return this.requestHistory[this.requestHistory.length - 1]
  }

  get lastWeatherResponse (): WeatherInterface | WeatherErrorInterface | null {
    return this.weatherHistory[this.weatherHistory.length - 1]
  }
}
</script>

<style>

</style>
This is pretty neat because I can see at a glance exactly what type of data is allowed in my requestHistory and weatherHistory arrays. If I revisit this code in the future, I can simply look in those files, or use code hinting whenever I implement one of those types to see what properties they should contain!
Step 4 Make the Weather Component
We figured out the couple of small pieces of logic we needed in the React tutorial, so we'll focus on how to implement this component in Vue, and skip the logic pieces. There are three nice things to point out here. Since my vue template is not JSX and I can use standard markup on my SVG, so I can simply paste it into the view.
The second is that we can use computed properties to set the height and color of the mercury in the temp gauge based on the current temperature. This has minor performance benefits, as well as it looks clean and easy to grok in the code.
The third is that I can easily contain my styles to my component. I know that these styles are unique to this display, so it's simple in vue to contain these within my component all I have to do is add the attribute scoped to the style tag. If this componente was used in a larger project I wouldn't have to worry about the styling classes leaking out to other parts of the page.
Here's our Weather.vue component.
<template>
  <div class="wrap">
    <div class="thermometer">
      <svg xmlns:rdf="http://www.w3.org/1999/02/22-rdf-syntax-ns#" xmlns="http://www.w3.org/2000/svg" xmlns:cc="http://web.resource.org/cc/" xmlns:dc="http://purl.org/dc/elements/1.1/" xmlns:svg="http://www.w3.org/2000/svg" id="svg2" viewBox="0 0 256 512" version="1.0"
        style="max-width: 120px">
        <g id="layer1">
          <g id="g3030">
            <g id="g2984" stroke="#000" stroke-width="4" fill="none">
              <path id="path2931" d="m80 64h48"/>
              <path id="path2935" d="m80 384h48"/>
              <path id="path2937" d="m80 224h48"/>
              <path id="path2939" d="m80 192h16"/>
              <path id="path2941" d="m80 160h16"/>
              <path id="path2943" d="m80 128h16"/>
              <path id="path2945" d="m80 96h16"/>
              <path id="path2947" d="m80 256h16"/>
              <path id="path2949" d="m80 288h16"/>
              <path id="path2951" d="m80 320h16"/>
              <path id="path2953" d="m80 352h16"/>
            </g>
            <g id="g3023">
              <rect id="rect2922" rx="16" ry="16" height="416" width="32" y="32" x="48" fill="#eeeeec"/>
              <rect id="rect3021" rx="0" ry="0" height="64" width="32" y="384" x="48" :fill="tempAsColor"/>
              <path id="path2924" :fill="tempAsColor" d="m96 448a32 32 0 1 1 -64 0 32 32 0 1 1 64 0z"/>
              <rect id="mercury" transform="scale(-1 -32)" rx="0" ry="0" :height="tempAsHeight" width="32" y="-12" x="-80" :fill="tempAsColor"/>
              <path id="rect2968" stroke-linejoin="round" d="m64 32c-8.864 0-16 7.136-16 16v372.28c-9.564 5.54-16 15.88-16 27.72 0 17.66 14.336 32 32 32s32-14.34 32-32c0-11.84-6.436-22.18-16-27.72v-372.28c0-8.864-7.136-16-16-16z" stroke="#000" stroke-linecap="round" stroke-width="4" fill="none"/>
            </g>
            <text id="low" font-size="20px" xml:space="preserve" transform="scale(.99840 1.0016)" y="383.38419" x="136.21846" font-family="Bitstream Vera Sans" line-height="125%" fill="black">
              <tspan id="tspan3003" y="383.38419" x="136.21846">0°F</tspan>
            </text>
            <text id="middle" font-size="20px" xml:space="preserve" line-height="125%" y="224" x="136" font-family="Bitstream Vera Sans" fill="black">
              <tspan id="tspan3011" y="224" x="136">50°F</tspan>
            </text>
            <text id="high" font-size="20px" xml:space="preserve" line-height="125%" y="63.830078" x="135.32617" font-family="Bitstream Vera Sans" fill="black">
              <tspan id="tspan3007" y="63.830078" x="135.32617">100°F</tspan>
            </text>
          </g>
        </g>
      </svg>
    </div>
    <div className="readout">
      <h2>{{weatherData.locale}}</h2>
      <h1>{{Math.round(weatherData.currentTemp)}}<small><sup>°F</sup></small></h1>
      <h3>{{weatherData.condition}}</h3>
      <p>
        <span>high: {{Math.round(weatherData.high)}}<small><sup>°F</sup></small></span><br />
        <span>low: {{Math.round(weatherData.low)}}<small><sup>°F</sup></small></span>
      </p>
    </div>
  </div>
</template>

<script lang="ts">
import { Component, Prop, Vue } from 'vue-property-decorator'
import { WeatherInterface } from '../types/Weather.Interface'

@Component
export default class Weather extends Vue {
  @Prop()
  weatherData!: WeatherInterface;

  get tempAsHeight () {
    return this.weatherData.currentTemp * 0.1
  }

  get tempAsColor () {
    const hue = 200 + (160 * (this.weatherData.currentTemp / 100))
    return `hsl(${hue}, 100%, 50%)`
  }
}
</script>

<!-- Add "scoped" attribute to limit CSS to this component only -->
<style scoped>
.wrap {
  display: flex;
  align-items: center;
}

.readout {
  text-align: left;
}

.readout h1, .readout h2 {
  margin: 0;
}

.readout h1 {
  font-size: 2.75em;
  font-weight: 900;
}

.readout h1 sup {
  font-weight: 300;
}

.thermometer {
  width: 110px;
}
</style>
I modified my App.vue component to pass in some initial data to my component, as well as render it only when there's data to render.
<template>
<div id="app">
<Weather v-if="lastWeatherResponse"
:weather-data="lastWeatherResponse" />
</div>
</template>
<script lang="ts">
import { Component, Vue } from 'vue-property-decorator'
import Weather from './components/Weather.vue'
import { WeatherInterface } from './types/Weather.Interface'
import { WeatherErrorInterface } from './types/WeatherError.Interface'
import { GeoQueryInterface } from './types/GeoQuery.Interface'
import { SearchInterface } from './types/Search.Interface'
@Component({
components: {
Weather
}
})
export default class App extends Vue {
viewState = 'empty';
requestHistory: Array<GeoQueryInterface | SearchInterface> = [];
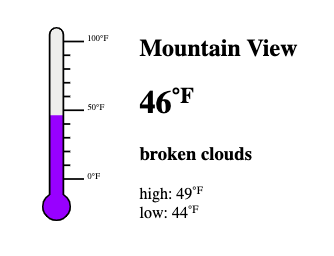
weatherHistory: Array<WeatherInterface | WeatherErrorInterface> = [{
locale: 'Mountain View',
currentTemp: 46.36,
high: 48.99,
low: 44.01,
condition: 'broken clouds'
}];
get lastRequest (): GeoQueryInterface | SearchInterface | null {
return this.requestHistory[this.requestHistory.length - 1]
}
get lastWeatherResponse (): WeatherInterface | WeatherErrorInterface | null {
return this.weatherHistory[this.weatherHistory.length - 1]
}
}
</script>
<style>
body, #app {
display: flex;
justify-content: center;
align-items: center;
min-height: 100vh;
}
</style>
At this point we finally have some nice output from our application.
Let's pause here again and look at another benefit using Typescript is affording me. Since I defined the property of my Weather component weatherData to be a WeatherInterface implementation, my IDE can tell me what properties are available on that property wherever I am referencing it!
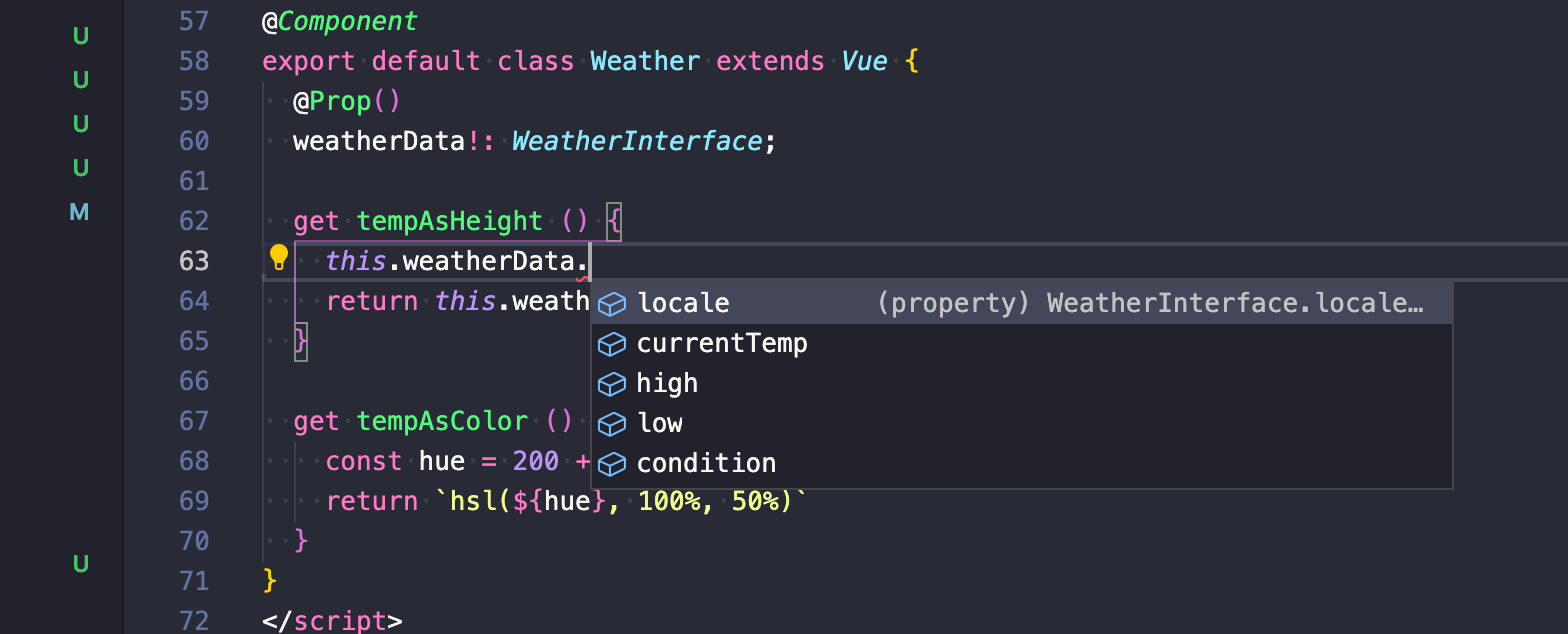
This seems like a small thing, but think about the implications for a team producing interfaces for imported components and data structures. No longer do you have to spend time switching back and forth between your code and the source to figure out what properties are available. This becomes even more valuable when functions are are defined along with complex outputs.
Step 5 Make the Input Component
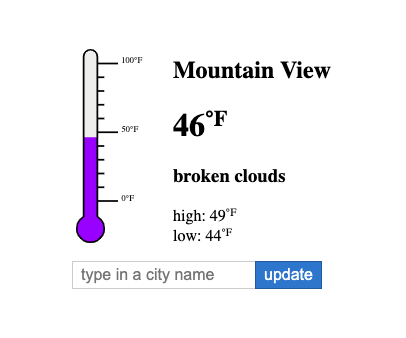
One thing that's quick to notice is that the code for this component is radically simpler. With React we were required to bind a value to the input and keep it up to date. It is the convention in react to manage all of your data binding, though there are some libraries out there that can do the heavy lifting for you. Vue comes baked in with two way binding, nicely keeping my data model up to date with my view, nothing extra to think about!
Here's my CityInput.vue component.
<template>
  <form v-on:submit.prevent="handleSubmit()">
    <input type="text" v-model="stateValue" placeholder="type in a city name" />
    <input type="submit" value="update" />
  </form>
</template>

<script>
import { Component, Vue } from 'vue-property-decorator'

@Component
export default class Weather extends Vue {
  stateValue = '';

  handleSubmit () {
    if (this.stateValue.trim().length) {
      this.$emit('update', {
        params: [this.stateValue]
      })
      this.stateValue = ''
    }
  }
}
</script>

<style>
form {
  display: flex;
}

input, button {
  font-size: 1em;
  padding: .25rem .5rem;
  border-radius: 0;
}

input[type="text"] {
  border: 1px solid #ccc;
  border-right: 0;
  flex-grow: 1;
}

input[type="submit"], button {
  border: 1px solid #005c9e;
  background-color: #0077cc;
  color:white;
}
</style>
There is one part of this component that bothers me though. Since I am using a Type System it would be nice if I was able to define the types of output I am emitting from this component. The data structure is the same as the SearchInterface interface I created earlier, however, I have no simple convention available to notify the parent component what the output of these emitted event is.
To be clear; there are ways to typehint the output I am emitting, the problem is they are not common conventions, they aren't simple and they add complexity to my project. For those reasons, it's difficult for me to want to spend the extra effort to implement a workaround solution.
Step 6 port over the Interface and Adaptor
Same with the components, we're not going to talk about the logic again, because we've already figured that out in the React part. All we need to do to make the OpenWeatherService and OpenWeatherServiceAdaptor to work is port them over to Typescript. In doing so, I do a minor refactor of the code as well. Instead of making my response polymorphic, I decide to throw an error if the weather response fails.
The convention in this codebase is to add different types of classes to named folder, so for these utility (service) classes I make a new folder services and add these files.
OpenWeatherAdaptor.ts
import OpenWeatherService from './OpenWeatherService'
import { WeatherInterface } from '../types/Weather.Interface'

export default class OpenWeatherAdaptor {
  translateOutput (response: any): WeatherInterface {
    if (response.message) {
      throw new Error('We are temporarily unable to get weather data, please check back soon!')
    } else {
      return {
        locale: response.name,
        currentTemp: response.main.temp,
        high: response.main.temp_max,
        low: response.main.temp_min,
        condition: response.weather[0].description
      }
    }
  }

  async getWeather (byWhat: string, args: Array<any>): Promise<WeatherInterface> {
    const ws = new OpenWeatherService()
    let response
    if (byWhat === 'city') {
      response = await ws.getWeatherForCity(args[0])
    } else {
      response = await ws.getWeatherForGeo(args[0], args[1])
    }
    return this.translateOutput(response)
  }
}
OpenWeatherService.ts
export default class OpenWeatherService {
  appid = '...';
  apiDomain = 'https://api.openweathermap.org/data/2.5/';

  async getWeatherForGeo (lon: number, lat: number) {
    const endpointUrl: URL = new URL(this.apiDomain)
    endpointUrl.pathname += 'weather'
    endpointUrl.search = new URLSearchParams({
      appid: this.appid,
      lat: lat,
      lon: lon,
      units: 'imperial'
    } as any).toString()
    const response = await fetch(endpointUrl.toString())
    const json = await response.json()
    return json
  }

  async getWeatherForCity (city: string) {
    const endpointUrl = new URL(this.apiDomain)
    endpointUrl.pathname += 'weather'
    endpointUrl.search = new URLSearchParams({
      appid: this.appid,
      q: city,
      units: 'imperial'
    }).toString()
    const response = await fetch(endpointUrl.toString())
    const json = await response.json()
    return json
  }
}
The most important part to point out here is the nicely typed and predictable return value for the getWeather function. We know it is a promise, and we know that it will ONLY return a WeatherInterface type. The means we can be certain of what we're passing from our service into our component!
Now we get this working by by tying it into the App.vue component, wiring the data output from the CityInput.vue component to the OpenWeatherAdaptor and then taking the response from the adaptor and feeding it to our state which is pumped into the Weather.vue component. I refactor the template a little as well to make it clear what's happening with the overall view states. When an error is present, we only display that along with a [go back] button, and if the state is ready, we render the Weather component.
App.vue
<template>
  <div id="app">
    <template v-if="viewState != 'error'">
      <Weather v-if="viewState == 'ready'"
        :weather-data="lastWeatherResponse" />
      <city-input @update="updateSearch" />
    </template>
    <template v-if="viewState == 'error'">
      <p className="error">{{lastWeatherResponse.error}}</p>
      <button @click="goBack()">go back</button>
    </template>
  </div>
</template>

<script lang="ts">
import { Component, Vue } from 'vue-property-decorator'
import Weather from './components/Weather.vue'
import CityInput from './components/CityInput.vue'
import { WeatherInterface } from './types/Weather.Interface'
import { WeatherErrorInterface } from './types/WeatherError.Interface'
import { GeoQueryInterface } from './types/GeoQuery.Interface'
import { SearchInterface } from './types/Search.Interface'
import OpenWeatherAdaptor from './services/OpenWeatherAdaptor'

@Component({
  components: {
    Weather,
    CityInput
  }
})
export default class App extends Vue {
  viewState = 'ready';
  requestHistory: Array<GeoQueryInterface | SearchInterface> = [];
  weatherHistory: Array<WeatherInterface | WeatherErrorInterface> = [{
    locale: 'Mountain View',
    currentTemp: 46.36,
    high: 48.99,
    low: 44.01,
    condition: 'broken clouds'
  }];

  get lastRequest (): GeoQueryInterface|SearchInterface|null {
    return this.requestHistory[this.requestHistory.length - 1]
  }

  get lastWeatherResponse (): WeatherInterface|WeatherErrorInterface|null {
    return this.weatherHistory[this.weatherHistory.length - 1]
  }

  async updateSearch (search: SearchInterface): Promise<void> {
    this.viewState = 'loading'
    const wa = new OpenWeatherAdaptor()
    try {
      const response = await wa.getWeather('city', search.params)
      this.weatherHistory.push(response)
      this.viewState = 'ready'
    } catch (e) {
      this.weatherHistory.push({
        error: e
      } as WeatherErrorInterface)
      this.viewState = 'error'
    }
  }

  goBack () {
    if (this.weatherHistory.length > 1) {
      this.weatherHistory.pop()
      this.viewState = 'ready'
    }
  }
}
</script>

<style>
body, #app {
  display: flex;
  justify-content: center;
  align-items: center;
  min-height: 100vh;
  flex-direction: column;
}
</style>
With all of that together we've got this displaying in the browser.
Step 7 Final Bits
There are only a few things left to be done, and since they don't really differ greatly we won't do much more than enumerate them here. We add a component to handle the 'loading' view state of the application, we add the logic to start with the user's geo coordinates by default.
Here is a final look at the root App.vue component with these enhancements in place.
<template>
  <div id="app">
    <template v-if="viewState == 'ready'">
      <Weather :weather-data="lastWeatherResponse" />
      <city-input @update="updateSearch" />
    </template>
    <template v-if="viewState == 'error'">
      <p className="error">{{lastWeatherResponse.error}}</p>
      <button @click="goBack()">go back</button>
    </template>
    <loading-spinner v-if="viewState == 'loading'"></loading-spinner>
  </div>
</template>

<script lang="ts">
import { Component, Vue } from 'vue-property-decorator'
import Weather from './components/Weather.vue'
import CityInput from './components/CityInput.vue'
import LoadingSpinner from './components/LoadingSpinner.vue'
import { WeatherInterface } from './types/Weather.Interface'
import { WeatherErrorInterface } from './types/WeatherError.Interface'
import { GeoQueryInterface } from './types/GeoQuery.Interface'
import { SearchInterface } from './types/Search.Interface'
import OpenWeatherAdaptor from './services/OpenWeatherAdaptor'

@Component({
  components: {
    Weather,
    CityInput,
    LoadingSpinner
  }
})
export default class App extends Vue {
  viewState = 'ready';
  requestHistory: Array<GeoQueryInterface | SearchInterface> = [];
  weatherHistory: Array<WeatherInterface | WeatherErrorInterface> = [{
    locale: 'Mountain View',
    currentTemp: 46.36,
    high: 48.99,
    low: 44.01,
    condition: 'broken clouds'
  }];

  created () {
    if (navigator.geolocation) {
      navigator.geolocation.getCurrentPosition(pos => {
        if (pos.coords && pos.coords.longitude) {
          this.updateGeoPosition({
            params: [pos.coords.longitude, pos.coords.latitude]
          })
        }
      })
    }
  }

  async updateGeoPosition (search: GeoQueryInterface) {
    this.viewState = 'loading'
    const wa = new OpenWeatherAdaptor()
    try {
      const response = await wa.getWeather('geo', search.params)
      this.weatherHistory.push(response)
      this.viewState = 'ready'
    } catch (e) {
      this.weatherHistory.push({
        error: e
      } as WeatherErrorInterface)
      this.viewState = 'error'
    }
  }

  get lastRequest (): GeoQueryInterface|SearchInterface|null {
    return this.requestHistory[this.requestHistory.length - 1]
  }

  get lastWeatherResponse (): WeatherInterface|WeatherErrorInterface|null {
    return this.weatherHistory[this.weatherHistory.length - 1]
  }

  async updateSearch (search: SearchInterface): Promise<void> {
    this.viewState = 'loading'
    const wa = new OpenWeatherAdaptor()
    try {
      const response = await wa.getWeather('city', search.params)
      this.weatherHistory.push(response)
      this.viewState = 'ready'
    } catch (e) {
      this.weatherHistory.push({
        error: e
      } as WeatherErrorInterface)
      this.viewState = 'error'
    }
  }

  goBack () {
    if (this.weatherHistory.length > 1) {
      this.weatherHistory.pop()
      this.viewState = 'ready'
    }
  }
}
</script>

<style>
body, #app {
  display: flex;
  justify-content: center;
  align-items: center;
  min-height: 100vh;
  flex-direction: column;
}
</style>
The full project can be cloned from the git repo!
How does it score?
Same as with the React example, I'm going to score this against the SOLID principles.
Single Responsibility Principle
Same as with React, Vue doesn't have an opinion on how to separate these concerns. It does however, do a pretty good job of separating the concerns for the developer. Any .vue file is capable of having a <template>, <script> and <style>. It also (in my opinion) does a better job of separating these concerns for the developer. I don't have to look for template fragments all over the place in my code expressed as JSX, I can simply see what the state of my view layer should look like with all of the view specific logic right in the <template> block.
Once again, this isn't strictly the definition of the SRP, however, this is how Vue observes the SRP itself. Due to an overall better developer experience in this area I give Vue an eight out of ten for the Single Responsibility Principle.
Open Closed Principle
This is another area that has been slightly improved over React's implementation. When using Vue without Typescript you have the ability to define your input prop types. Typescript notches this up to an even better level. The ability to type define your inputs means that you can head off errors much more efficiently. It also protects your component from the temptation to change how it works when the structure of the data changes.
Adding Typescript here has allowed us to make the tooling much better. Most IDEs with good Typescript support can provide precise code hinting when you are working with these objects you've defined as inputs. This makes development much faster, and the overall experience much better and less error prone.
Where this particular implementation of Vue fails is the inability to easily type define the data that is emitted from components to their parents. This is probably due to the fact that Typescript in Vue 2 is a fairly late addition. it was tacked on after the Vue API was created which focused more on ES6 than Typescript. There is hope that Vue 3 will provide a good solution for this problem.
All of that said Vue scores a seven out of ten for the Open Closed Principle.
Liskov Substitution Principle
Just as with React, as long as you follow the best practices for creating Vue applications, most parts of the application are easy to make portable. The niceties of Typescript make this even more apparent how to implement components with well defined input properties. Since most of the benefit comes from Typescript and not from Vue, it shouldn't rank higher than React on this principle. Also, due to the oversight of having type defined events, it is clear that the implementation of Typescript here is lacking. This scores Vue an overall eight out of ten for the Liskov Substitution Principle.
Interface Segregation Principle
Same as with React, you have complete control over how you segregate your components and functionality. Unlike react though, Vue doesn't give you the ability to implement extremely small reusable stateless components as simple functions that return JSX. Every component is a complete component bringing all of the complexity of a component with all of the bells and whistles.
There is a benefit to this strategy though. With React, the ability to have components and micro functions means that you can have fragments of HTML expressed in JSX just about anywhere in your application. This means it's hard to wrap your brain around the mental model of the HTML you are creating for your view. Having a convention in place where your components are predictable, importable and reusable means that the <template> XML is more expressive and easier to grok.
So there are some drawbacks and some benefit here between React and Vue, but overall they both score well. On the Interface Segregation Principle I score Vue a solid nine out of ten.
Dependency Inversion Principle
Vue suffers from the same issue that React does in this area. Vue does not implement Dependency Injection or any other pattern that would allow me to easily substitute imported modules. The sharpest place that this issue presents itself in both Vue and React is the assumption that this code is running in a browser environment.
Vue provides no means by which to use an interface into browser APIs, making functionality like the automatic loading of geo-coordinates easily testable. This means that Vue and React rely on the browser which is a core faliure of this principle.
The verdict here is the same as the verdict for React. Vue does not attempt to provide the user with a dependency container that would allow for Dependency Injection and it relies on the browser APIs to work. Vue scores poorly here with a five out of ten.
Conclusion
So Vue scores a little better here gaining a few points in a couple key areas, but still doesn't attempt to solve some of the tough challenges that SOLID presents. Vue is closer to a framework than React is though, which is ONLY a view implementation library with no batteries included. The overall developer experience has been improved over Vue with easier integration of Typescript which allows for some great IDE features to exist.
Vue might have scored higher here if it had picked up more points in the Dependency Inversion Principle area, however it is not functionally different from React in this way. This brings us to the third installment of this series where we re-implement this project in Angular! (Coming Soon)